To run the script for unloading filament go to the LCD panel and select Utilities Filament Options then select Unload for the extruder you wish to unload. The extruder stepper motor on my Makerbot Replicator 2 has started stuttering.

Replicator 2 Disassembling The Extruder
MakerBot Replicator 2 DESKTOP 3D PRINTER SINGLE EXTRUDER Welcome to prosumer 3D printing.

. Repair or upgrade your MakerBot Replicator 3D printers with our MakerBot parts accessories. We set a new standard. Pull on the connector to release it.
Before replacing the extruder on MakerBot Sketch please make sure to do the following things. Power off the printer by flipping the switch on the right side of the printer. Allow the extruder to cool to below 35c.
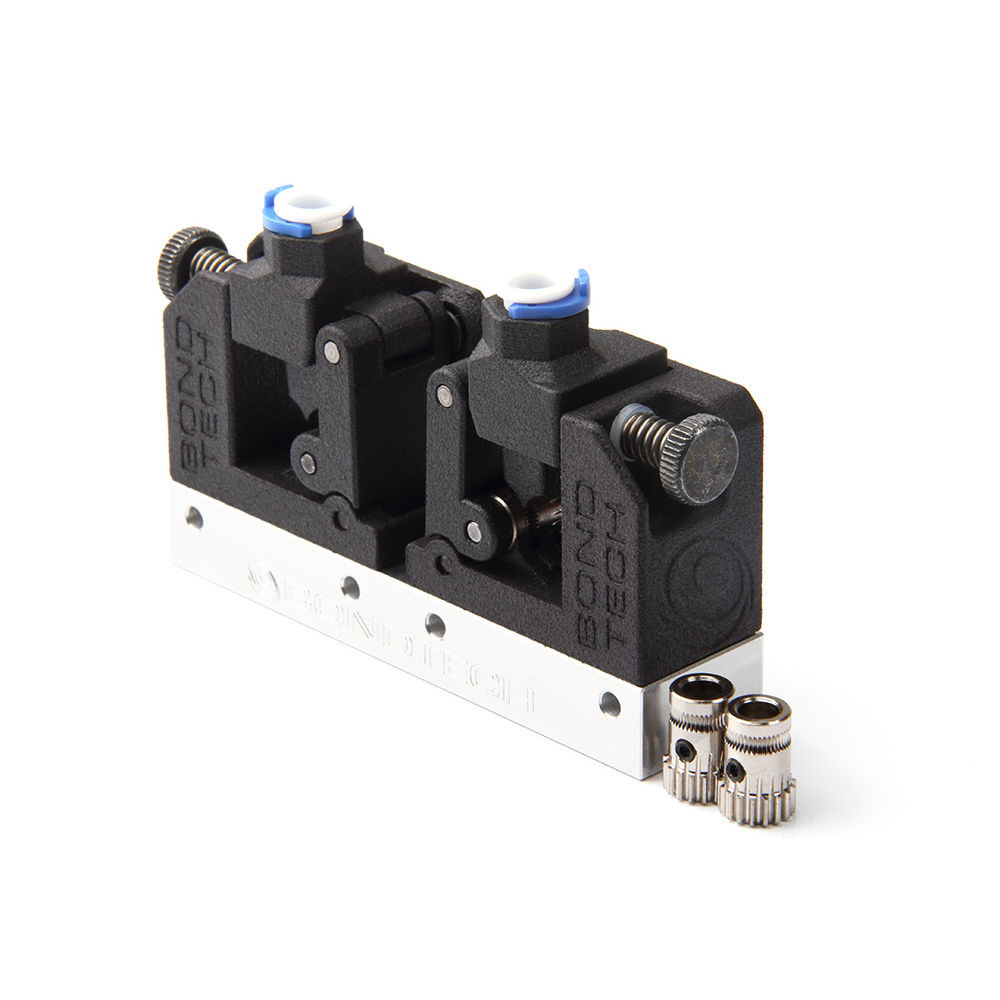
The MM2X Multi-Material Dual Extruder is a replacement dual extruder system for the Makerbot Replicator 2X. This kit includes everything needed to replace the delrin plunger on your Makerbot Replicator 2 and 1 with a spring-loaded sphere bearing assembly. Start and run the unload filament.
1- PU manual cast not printed not injection formed. Gently pull the active cooling duct away from the nozzle. Once all filament is unloaded switch off the power on the MakerBot Replicator 2X and unplug the power supply.
Nozzle and PTFE Pack for METHOD 1A 1XA 2A and 2XA Extruders. Experience New Tough PLA The Tough Smart Extruder. Id rather not have to buy another set of extruders if I can avoid it.
This pinch roller provides about 60N of force on the filament which provides enough driving pressure on the filament in combination with the stepper drive gear to prevent stripping. We have experience and expertise in support and printing with Makerbot printers and therefore took it upon ourselves to improve the nozzle system making multi-material. Unload Filament From Your Printer.
Read customer reviews find best sellers. Remove the extruder from the gantry. With a resolution capability of 100 microns and a massive 410-cubic-inch build volume the MakerBot Replicator 2 Desktop 3D Printer is our easiest fastest and most affordable tool yet for making professional-quality models.
Build Plate Kit for MakerBot Replicator. - There are 2 designs. Ad Extruders from MakerBot That Offer Consistent High Performance.
Ad Shop Now Makerbot Replicator 2 Extruder. PVA support is recommended for Nylon and likewise it looks like Support Extruder 2 is recommended with 2XA greyed out. The filament drive upgrade comes as a full kit containing all precisely CNC machined parts from aluminum that.
Howerver Im pretty sure it is not intended to accept 12V and. Ad Browse discover thousands of brands. Time for yet another upgrade for our faithful MakerBot Replicator 2 3D printer this time we are going to be upgrading the plastic filament drive mechanism of the extruder with a better all metal version from Fabberworld.
Showing all 63 results. Urn off the T MakerBot Replicator 2. 2- Printed Printed in PLA with makerbot.
Maked my 7 year old 1800 printer work like it was brand new. R Unplug power and USB cables. Unload any filament from the extruder.
For ex Makerbots site seems to say Nylon requires Material Extruder 1 1XA is greyed out. Using the LCD Panel on your Replicator 2 go to Utilities and Change Filament. Print out and replace the Filament Drive system on the extruder with this one.
Cable is what I would replace long before even thinking it. I completely removed the motor from the extruder mechanism and the problem still happens so I know its nothing to do with a blocked nozzle or a clogged or stripped extruder gear or anything like that. These upgrades and modifications may be required in order to ensure proper prints and long life.
On Makerbot Replicator 2 Extruder Assembly. Allow the duct to hang. Pull on the connector to release it from the power input port.
Once any filament is unloaded switch off the power on the MakerBot Replicator 2 and unplug the power supply. Thing 42250 Replicator 2 Extruder Upgrade by whpthomas is one of these very useful designs. Hey Steamby This motor is designed as a replacement for the Makerbot replicator thats why you cant find any schematics or datasheet.
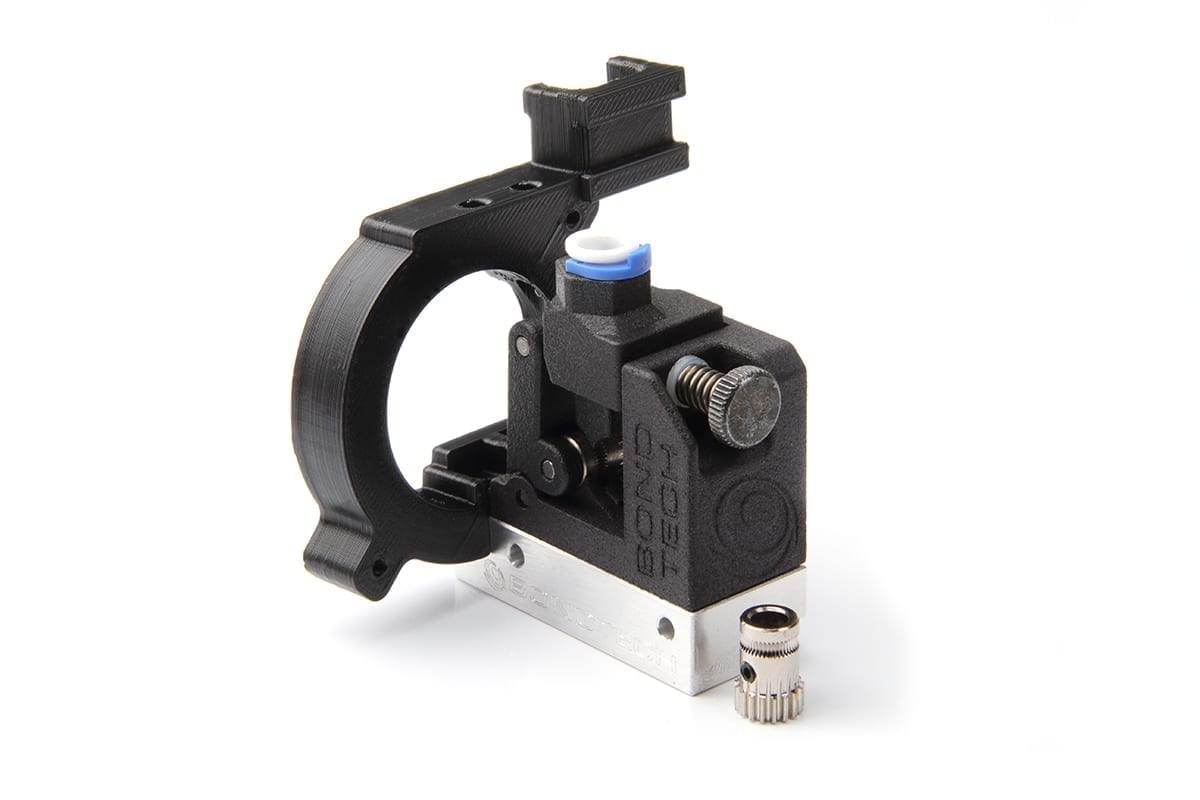
This extruder upgrade for the Replicator 2 replaces the Delrin plunger with a pinch roller. Its based on an extruder mod from Thingiverse superstar emmett who based his design on one from another star user whosawhatsis. Order the Extruder Cooling Fan as a replacement extruder fan for your Makerbot Replicator 2 Desktop 3D Printer.
This page deals with upgrades specific to the Makerbot Replicator 2 3D printer. The basic idea of this series of designs is to use a spring-loaded arm to squeeze the filament between the drive. You can check the extruder temperature by navigating to Utilities -- Status on the touchscreen.
To run the script for unloading filament go to the LCD panel and select Utilities Filament Options then select Unload. 3D printers supported include the Replicator 1 Replicator 2 Replicator 2X Mini 5th Gen and Z18 3D printers. It guarantees reliable printing with PLA ABS and other materials.
It has much greater resistance to heat compared to PLA or ABS. Detach the active cooling duct. Emove the filament guide tube and spool holder.
Unload the MakerBot Filament from the extruder. Follow the instructions on the Makerbot Screen. Use the 25 mm hex wrench to unscrew the two bolts holding.
Active Carbon Filter for MakerBot Clean Air System. Many of these parts can also be used on MakerBot clones such as FlashForge Creator Pro CTC and many others.
Bondtech Makerbot Repliucator 2x Upgrade Kit Canada Spool3d

Makerbot Replicator 2 Replacing The Extruder Cable Bundle Bilby 3d Tech Support

Makerbot Replicator 2 Extruder Assembly Robotshop

Mm2x Makerbot Replicator 2x Alternative Extruder Installation 13 Steps Instructables

Makerbot Spare Parts 3djake International
Flexion Extruder Kit Makerbot Replicator 2 Canada Spool3d

Replicator 2 Extruder Alternative Some Spring In Your Step Makerbot
Makerbot Replicator 2 Single Kit Bondtech
0 comments
Post a Comment